Setup OS Requirements MacOS
This section describes how to perform the setup for MacOS (previously OSX).
Please read through all of the documentation before commencing the installation procedure.
Installation Objective
This Installation Guide contains specific Mac 10.12 Sierra operating system requirements for the configuring of synerty-peek.
Required Software
Some of the software to be installed requires internet access. For offline installation some steps are required to be installed on another online server for the files to be packaged and transferred to the offline server.
Below is a list of all the required software:
- Xcode (from the app store)
- Oracle JDK
- Homebrew
- Python 3.6.x
- Postgres 12.x
Optional Software
- Oracle 12c Client
Installing Oracle Libraries is required if you intend on installing the peek agent. Instruction for installing the Oracle Libraries are in the Online Installation Guide.
- FreeTDS
FreeTDS is an open source driver for the TDS protocol, this is the protocol used to talk to the MSSQL SQLServer database.
Installation Guide
Follow the remaining section in this document to prepare your macOS operating system to run the Peek Platform.
The instructions on this page don’t install the peek platform, that’s done later.
Safari Open Safe Files
If you’re using safari on the mac (which you probably are), make sure Open “Safe” files after downloading is turned off.
This will cause Safari to unzip files that have been downloaded, and invalidate some of the install steps.
In Safari, press Command + , to bring up preferences.
Uncheck the Open “Safe” files after downloading checkbox.
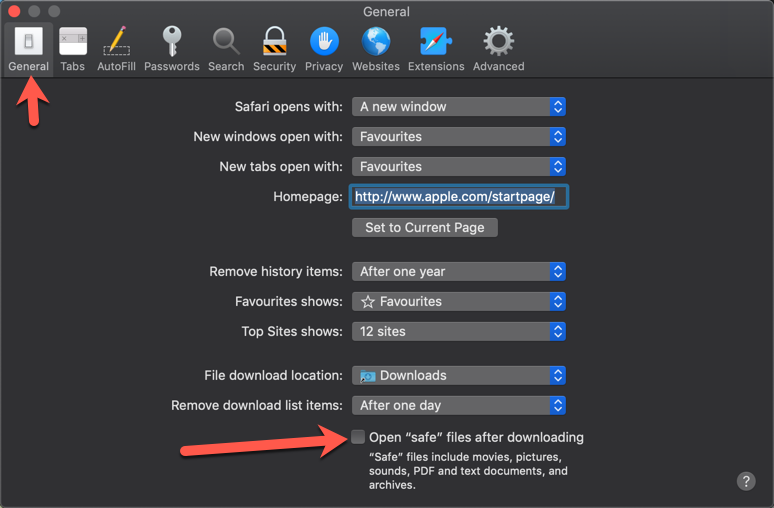
Close safari preferences.
Create Peek Platform OS User
Alternatively to creating a peek user, if you are developing with peek you
might want to Symlink the /Users/*developerAccount* to /Users/peek.
If doing this run: sudo ln -s /Users/*developerAccount*/ /Users/peek then
skip to the next step Install Xcode.
Create a user account for peek with admin rights.
sudo ln -s /Users/*developerAccount*/ /Users/peek
| Account Type: | Administrator |
|---|---|
| Username: | peek |
| Password: | PA$$W0RD |
Sign in to the peek account.
Important
All steps after this point assume you’re logged in as the peek user.
Install Xcode
From the app store, install Xcode.
Run Xcode and accept ‘Agree’ to the license. Xcode will then install components.
Exit Xcode
Run Terminal
Apple’s Command Line Developer Tools can be installed on recent OS versions by running this command in the Terminal:
xcode-select --install
A popup will appear, select ‘Install’ then ‘Agree’ to the license.
Agree to the Xcode license in Terminal run:
sudo xcodebuild -license
Type q, type agree and hit ‘Enter’
Install an Oracle JDK
Download the macOS disk image:
http://www.oracle.com/technetwork/java/javase/downloads/jdk8-downloads-2133151.html
Install Homebrew
Edit ~/.bash_profile and insert the following:
#### USE THE GNU TOOLS ####
# Set PATH to gnu tools
export PATH="`echo ~/bin:$PATH`"
To install Homebrew, run the following command in terminal:
/usr/bin/ruby -e "$(curl -fsSL https://raw.githubusercontent.com/Homebrew/install/master/install)"
Install gnu-sed for the build scripts
brew install gnu-sed
Install wget, needed for python download
brew install wget
Create the symlinks to prefer the GNU tools
mkdir ~/bin
ln -s `which gsed` ~/bin/sed
Install the dev libs that the python packages will need to compile
brew install openssl@1.1 zlib openldap
Install Python 3.6
Edit ~/.bash_profile and insert the following:
##### SET THE PEEK ENVIRONMENT #####
# Setup the variables for PYTHON
export PEEK_PY_VER="3.6.8"
export PATH="/Users/peek/cpython-${PEEK_PY_VER}/bin:$PATH"

# Set the variables for the platform release
# These are updated by the deploy script
export PEEK_ENV=""
export PATH="${PEEK_ENV}/bin:$PATH"
Warning
Restart your terminal you get the new environment.
Download and unarchive the supported version of Python
cd ~
source .bashrc
wget "https://www.python.org/ftp/python/${PEEK_PY_VER}/Python-${PEEK_PY_VER}.tgz"
tar xzf Python-${PEEK_PY_VER}.tgz
Configure the build
cd Python-${PEEK_PY_VER}

export LDFLAGS="-L/usr/local/opt/openssl/lib -L/usr/local/opt/zlib/lib"
export CPPFLAGS="-I/usr/local/opt/openssl/include -I/usr/local/opt/zlib/include"
export PKG_CONFIG_PATH="/usr/local/opt/openssl/lib/pkgconfig:/usr/local/opt/zlib/lib/pkgconfig"

./configure --prefix=/Users/peek/cpython-${PEEK_PY_VER}/ --enable-optimizations --enable-shared
Make and Make install the software
make install
Cleanup the download and build dir
cd
rm -rf Python-${PEEK_PY_VER}*
Symlink the python3 commands so they are the only ones picked up by path.
cd /Users/peek/cpython-${PEEK_PY_VER}/bin
ln -s pip3 pip
ln -s python3 python
cd
Open a new terminal and test that the setup is working
pass="/Users/peek/cpython-3.6.8/bin/python"
[ "`which python`" == "$pass" ] && echo "Success" || echo "FAILED"

pass="Python 3.6.8"
[ "`python --version`" == "$pass" ] && echo "Success" || echo "FAILED"

pass="/Users/peek/cpython-3.6.8/bin/pip"
[ "`which pip`" == "$pass" ] && echo "Success" || echo "FAILED"


pass="pip 18.1 from /Users/peek/cpython-3.6.8/lib/python3.6/site-packages/pip (python 3.6)"
[ "`pip --version`" == "$pass" ] && echo "Success" || echo "FAILED"
Upgrade pip:
pip install --upgrade pip
The following packages are required to package/deploy the macOS release.
Note
This is required for the pymysql setup.py
pip install Cython
synerty-peek is deployed into python virtual environments. Install the virtualenv python package
pip install virtualenv
The Wheel package is required for building platform and plugin releases
pip install wheel
Install PostGreSQL
Peek requires the PostGreSQL extension plpython3u. To install this extension, Peek has a modifed homebrew file that will include the build of this extension.
The following step will download peeks homebrew PostGreSQL install file and run it with brew.
Execute the following
cd ~
wget "https://bitbucket.org/synerty/synerty-peek/src/master/scripts/macos/postgres.rb"
brew install --verbose --build-from-source ./postgresql.rb
rm postgresql.rb
Start postgresql and create start at login launchd service:
brew services start postgresql
Allow the peek OS user to login to the database as user peek with no password
F=/usr/local/var/postgres/pg_hba.conf
cat | sudo tee $F <<EOF
# TYPE  DATABASE        USER            ADDRESS                 METHOD
local   all             postgres                                peer
local   all             peek                                    trust

# "local" is for Unix domain socket connections only
local   all             all                                     peer
# IPv4 local connections:
host    all             all             127.0.0.1/32            md5
# IPv6 local connections:
host    all             all             ::1/128                 md5
EOF
Create Postgres user
createuser -d -r -s peek
Create the database
createdb -O peek peek
Set the PostGreSQL peek users password
psql -d postgres -U peek <<EOF
\password
\q
EOF

# Set the password as "PASSWORD" for development machines
# Set it to a secure password from https://xkpasswd.net/s/ for production
Cleanup traces of the password
[ ! -e ~/.psql_history ] || rm ~/.psql_history
Finally, Download pgAdmin4 - A graphically PostGreSQL database administration tool.
Download the latest version of pgAdmin4 for macOS from the following link
Install Worker Dependencies
Install the parallel processing queue we use for the peek-worker tasks.
Redis
Install Redis via Homebrew with the following command:
brew install redis
Start redis and create a start at login launchd service:
brew services start redis
Open new terminal and test that Redis setup is working
pass="/usr/local/bin/redis-server"
[ "`which redis-server`" == "$pass" ] && echo "Success" || echo "FAILED"
Increase the size of the redis client queue
BEFORE="client-output-buffer-limit pubsub 64mb 16mb 90"
AFTER="client-output-buffer-limit pubsub 32mb 8mb 60"
sed -i "s/${BEFORE}/${AFTER}/g" /usr/local/etc/redis.conf

brew services restart redis
RabbitMQ
Install RabbitMQ via Homebrew with the following command:
brew install rabbitmq
Start rabbitmq and create a start at login launchd service:
brew services start rabbitmq
Edit ~/.bash_profile and insert the following:
##### SET THE RabbitMQ ENVIRONMENT #####
# Set PATH to include RabbitMQ
export PATH="/usr/local/sbin:$PATH"
Open new terminal and test that RabbitMQ setup is working
pass="/usr/local/sbin/rabbitmq-server"
[ "`which rabbitmq-server`" == "$pass" ] && echo "Success" || echo "FAILED"
Enable the RabbitMQ management plugins:
rabbitmq-plugins enable rabbitmq_mqtt
rabbitmq-plugins enable rabbitmq_management
Install Oracle Client (Optional)
The oracle libraries are optional. Install them where the agent runs if you are going to interface with an oracle database.
Make the directory where the oracle client will live
mkdir ~/oracle
Download the following from oracle.
The version used in these instructions is 18.1.0.0.0.
Note
Oracle version 18.1 is not available for macOS.
- Download the “Basic Package” from http://www.oracle.com/technetwork/topics/intel-macsoft-096467.html
- Download the “SDK Package” from http://www.oracle.com/technetwork/topics/intel-macsoft-096467.html
Copy these files to ~/oracle on the peek server.
Extract the files.
cd ~/oracle
unzip instantclient-basic-macos.x64-18.1.0.0.0.zip
unzip instantclient-sdk-macos.x64-18.1.0.0.0.zip
Add links to $HOME/lib to enable applications to find the libraries:
mkdir ~/lib
ln -s ~/oracle/instantclient_18_1/libclntsh.dylib ~/lib/
Edit ~/.bash_profile and insert the following:
##### SET THE ORACLE ENVIRONMENT #####
# Set PATH to include oracle
export ORACLE_HOME="`echo ~/oracle/instantclient_18_1`"
export PATH="$ORACLE_HOME:$PATH"

##### SET THE DYLD_LIBRARY_PATH #####
export DYLD_LIBRARY_PATH="$DYLD_LIBRARY_PATH:$ORACLE_HOME"
Install FreeTDS (Optional)
FreeTDS is an open source driver for the TDS protocol, this is the protocol used to talk to the MSSQL SQLServer database.
Peek needs a installed if it uses the pymssql python database driver, which depends on FreeTDS.
Note
FreeTDS 1.x doesn’t work, so be sure to install @0.91
Install FreeTDS via Homebrew:
brew install freetds@0.91
brew link --force freetds@0.91
Edit ~/.bash_profile and insert the following:
##### SET THE HOMEBREW ENVIRONMENT #####
# Set PATH to include fink
export PATH="/usr/local/opt/freetds@0.91/bin:$PATH"
Confirm the installation
tsql -C
You should see something similar to:
Compile-time settings (established with the "configure" script)
                            Version: freetds v0.91.112
             freetds.conf directory: /usr/local/Cellar/freetds@0.91/0.91.112/etc
     MS db-lib source compatibility: no
        Sybase binary compatibility: no
                      Thread safety: yes
                      iconv library: yes
                        TDS version: 7.1
                              iODBC: no
                           unixodbc: no
              SSPI "trusted" logins: no
                           Kerberos: no
Change Open File Limit on macOS
macOS has a low limit on the maximum number of open files. This becomes an issue when running node applications.
Make sure the sudo password timer is reset
sudo echo "Sudo is done, lets go"
Run the following commands in terminal:
echo kern.maxfiles=65536 | sudo tee -a /etc/sysctl.conf
echo kern.maxfilesperproc=65536 | sudo tee -a /etc/sysctl.conf
sudo sysctl -w kern.maxfiles=65536
sudo sysctl -w kern.maxfilesperproc=65536
Edit ~/.bash_profile and insert the following:
##### Open File Limit #####
ulimit -n 65536 65536
Restart the terminal
What Next?
Refer back to the How to Use Peek Documentation guide to see which document to follow next.