Setup OS Requirements RHEL
This section describes how to perform the setup for Red Hat Linux Server 7.4. The Peek platform is designed to run on Linux.
Please read through all of the documentation before commencing the installation procedure.
Installation Objective
This Installation Guide contains specific Red Hat Linux Server 7.4 operating system requirements for the configuring of synerty-peek.
Required Software
Some of the software to be installed requires internet access. For offline installation some steps are required to be installed on another online server for the files to be packaged and transferred to the offline server.
Below is a list of all the required software:
- Python 3.6.x
- Postgres 12.x
Optional Software
- Oracle Client
Installing Oracle Libraries is required if you intend on installing the peek agent. Instruction for installing the Oracle Libraries are in the Online Installation Guide.
- FreeTDS
FreeTDS is an open source driver for the TDS protocol, this is the protocol used to talk to the MSSQL SQLServer database.
Installation Guide
Follow the remaining section in this document to prepare your RHEL operating system for to run the Peek Platform.
The instructions on this page don’t install the peek platform, that’s done later.
Install Red Hat Linux Server 7.7 OS
This section installs the Red Hat Linux Server 7.7 64bit operating system.
Create VM
Create a new virtual machine with the following specifications
- 4 CPUs
- 8gb of ram
- 60gb of disk space
Install OS
Download the RHEL ISO Red Hat Enterprise Linux 7.7 Binary DVD from:
Mount the ISO in the virtual machine and start the virtual machine.
Note
Run through the installer manually, do not let your virtual machine software perform a wizard or express install.
Staring Off
At the Red Hat Enterprise Linux 7.7 installer boot menu screen, select:
Install Red Hat Enterprise Linux 7.7
At the language selection screen, select:
English
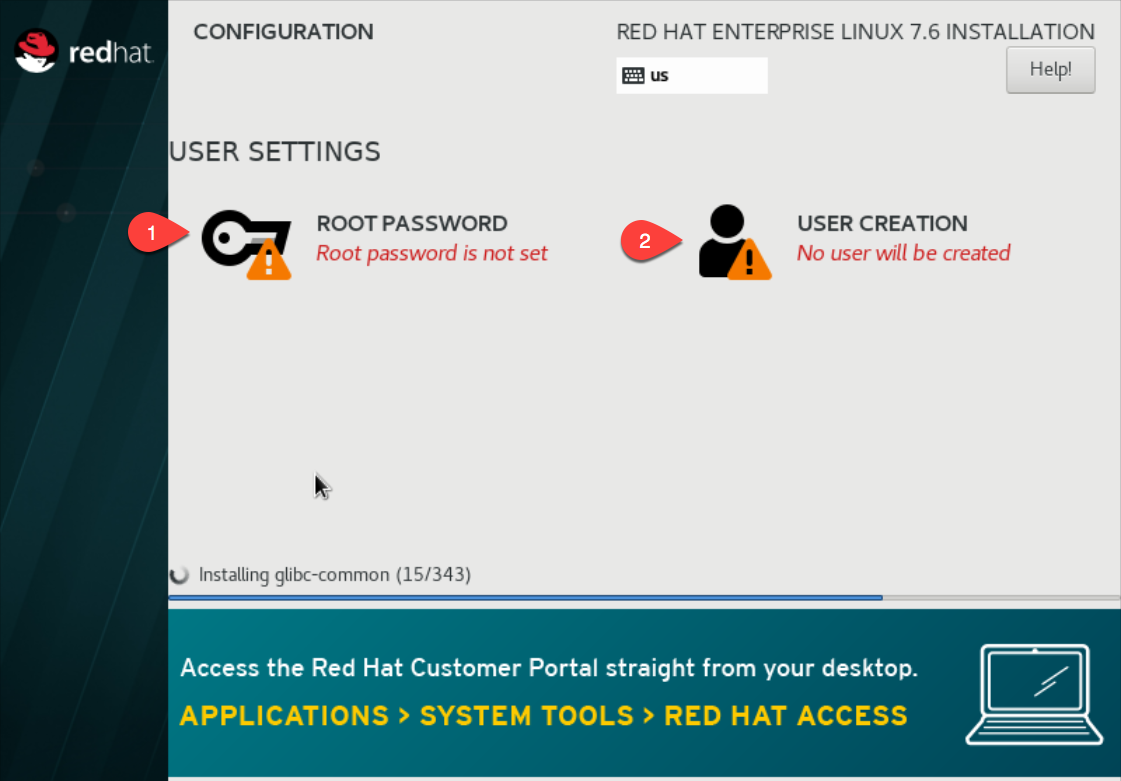
Next you will see a screen that lets you jump to any area to configure. The areas that need attention are numbered and explained in the following sections.
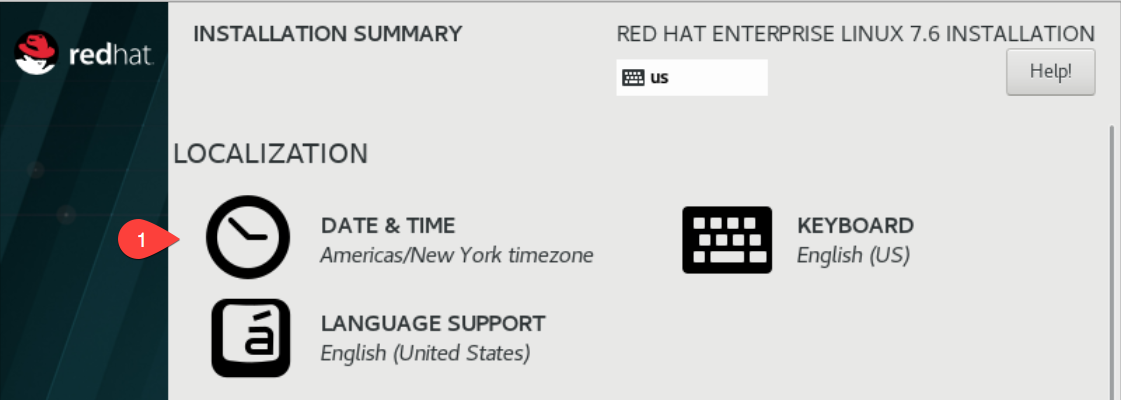

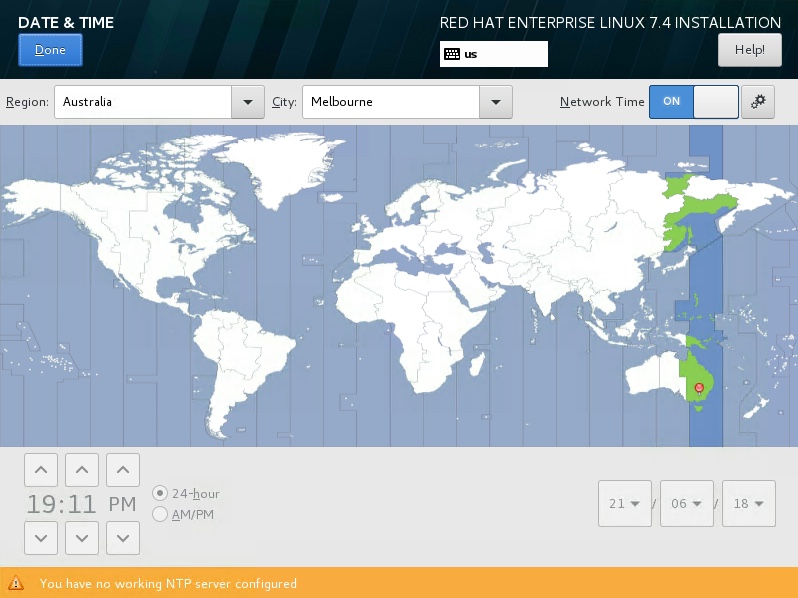
#1 Goto the DATE & TIME screen, select the appropriate time location.
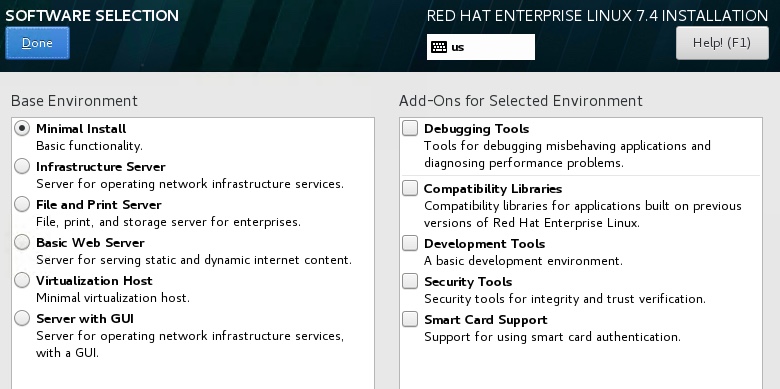
#2 Goto the SOFTWARE SELECTION screen, select Minimal Install or Server with GUI if you’d like a GUI.
#3 Goto the INSTALLATION DESTINATION screen
The following partitioning is recommended for DEV peek virtual machines.
Select:
I will configure partitioning.
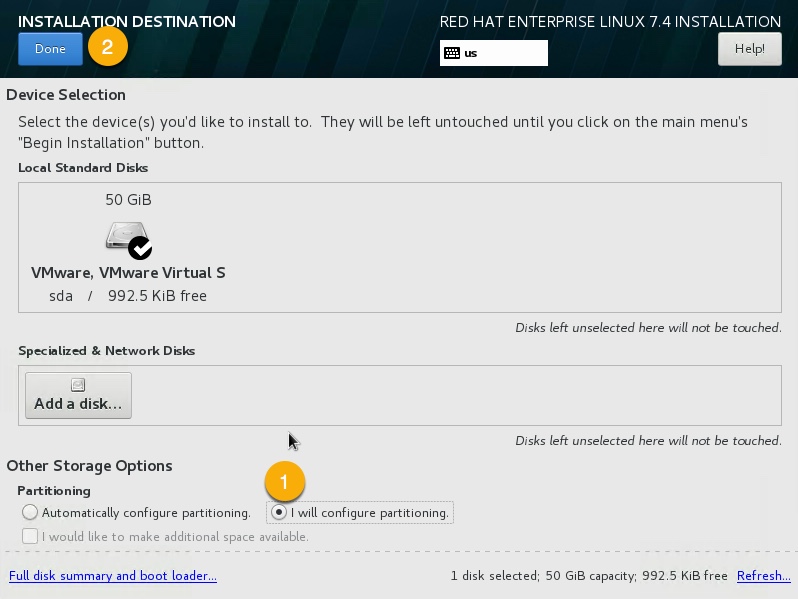
Select Done.
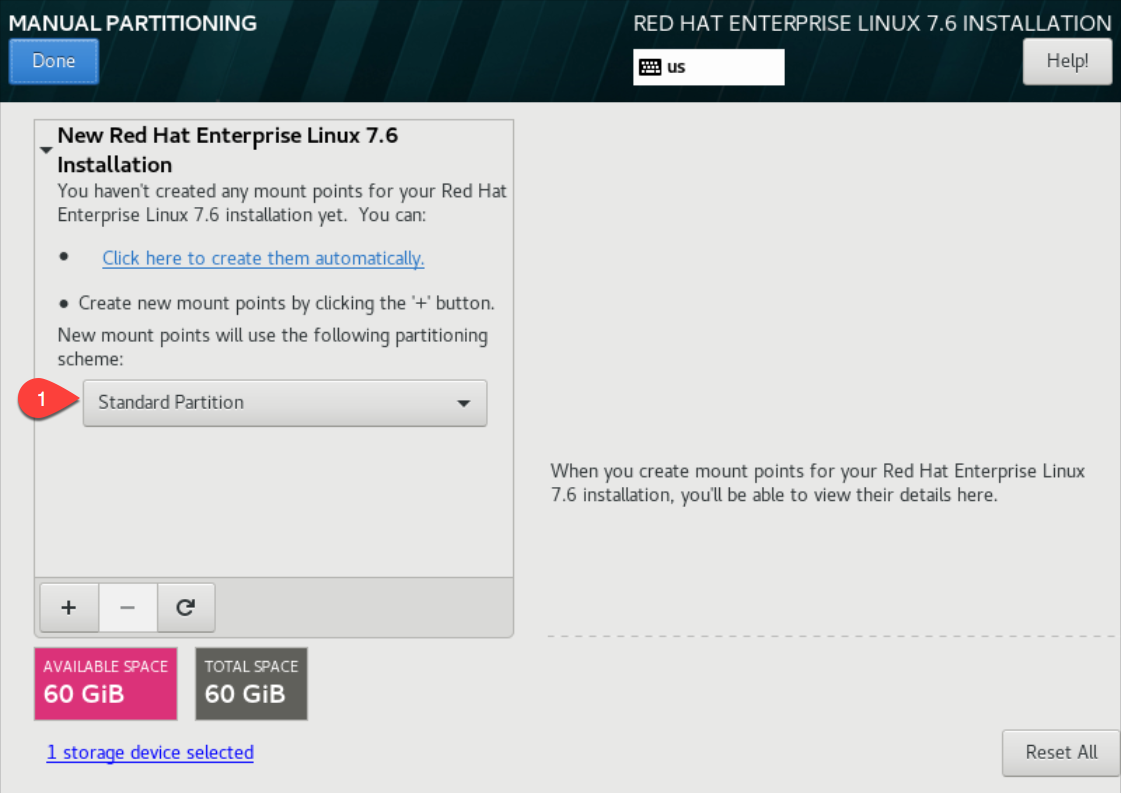
Partition Table
We’ll be creating three partitions, /boot, / and swap. For a heavily used production server you may want to create more virtual disks and separate out /var, /home, and /tmp. With one file system per disk.
Having one file system per disk allows VM software to easily expand the disk and filesystem as required.
Select Standard Partition
Again, This is to allow the virtual machine software to expand the DEV server disks more easily.
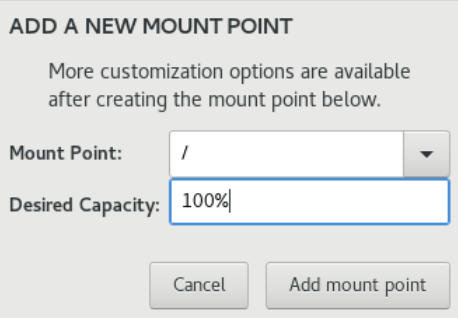
Add the partitions, for each partition, click the plus.
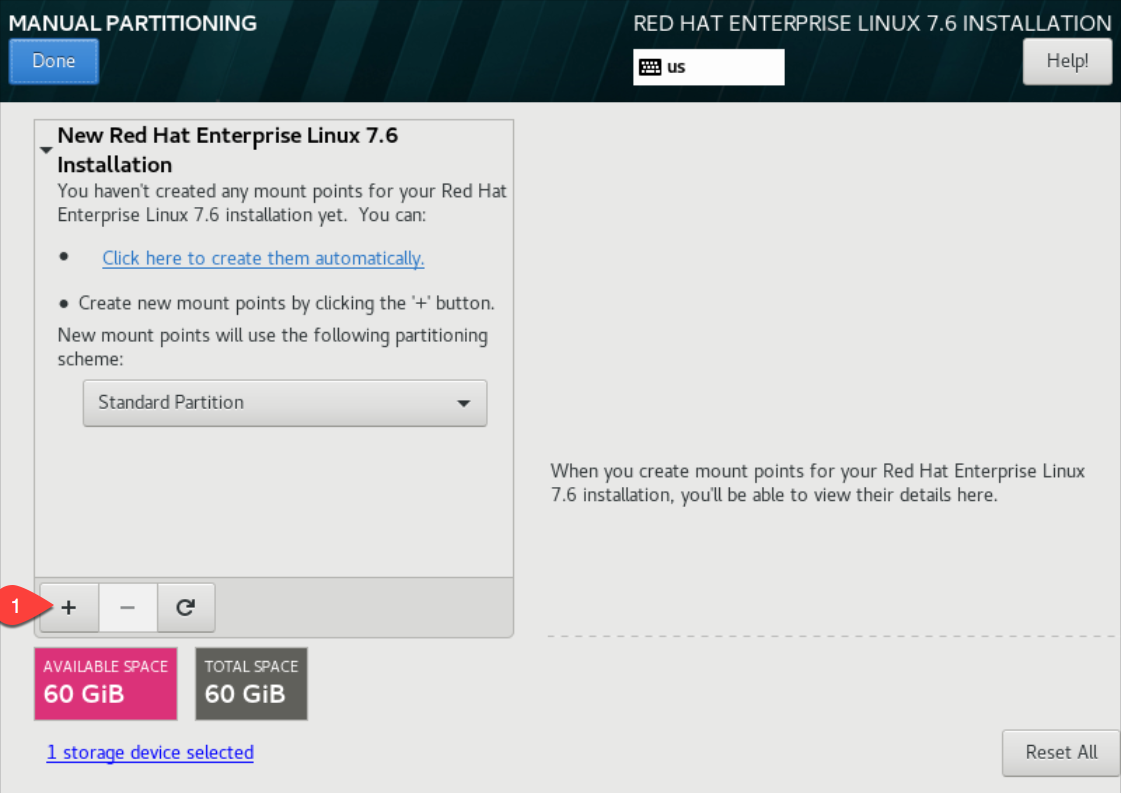
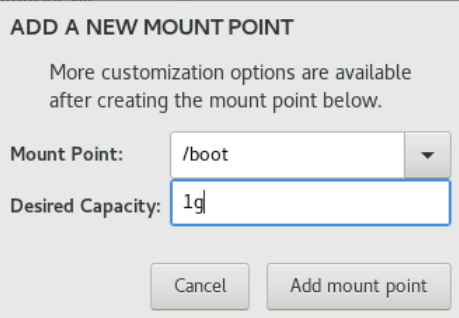
Set the Mount Point to /boot
Set the size to 1g
Click Add mount point
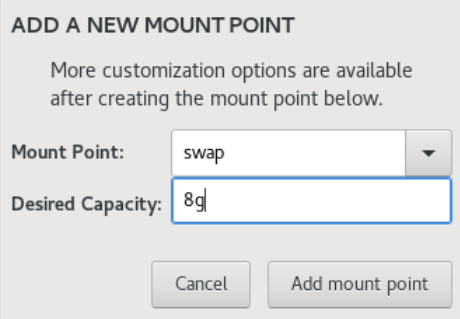
Set the Mount Point to swap
Set the size to 8g
Click Add mount point
Set the Mount Point to /
Set the size to 100%
Click Add mount point
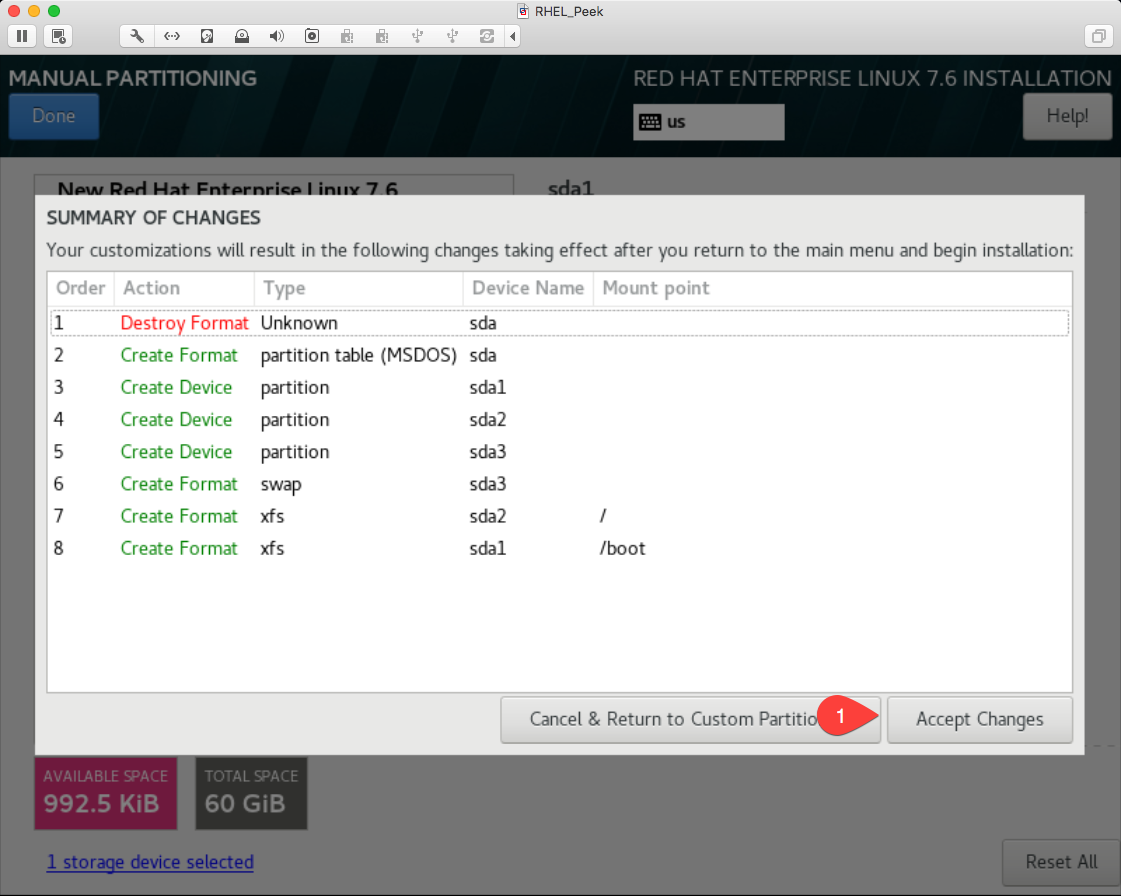
You should have a partition layout as follows, Click Done

Click Accept Changes
#4 Goto NETWORK & HOST NAME screen,
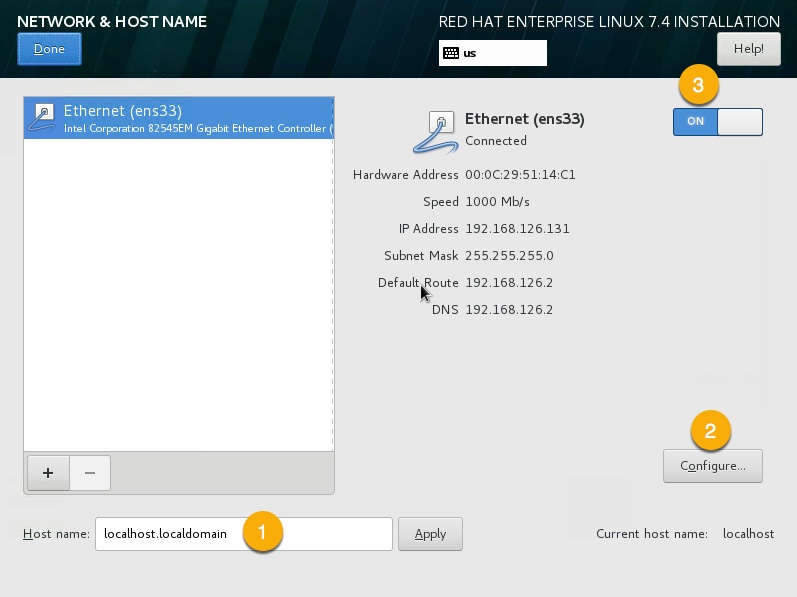
Enter your desired hostname, for example
peek.localdomain
- Turn on the Ethernet connection, this will get a DHCP IP Address.
Note
Make note of the DHCP IP Address
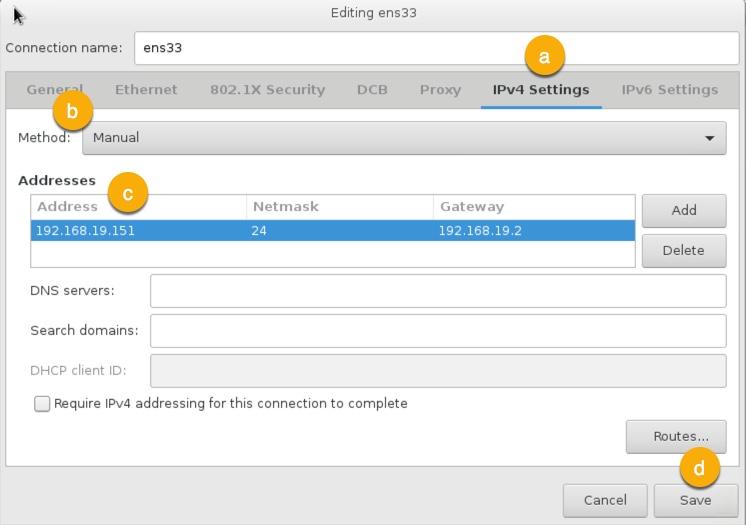
Otherwise, Configure a static IP address,
- Goto IPv4 Settings tab,
- Set Method to Manual,
- Add static IP address,
- Save.
Select DONE review the SUMMARY OF CHANGES
Click BEGIN INSTALLATION

While RHEL is installing, further installation steps need to be completed.
Configure the ROOT PASSWORD and the USER CREATION
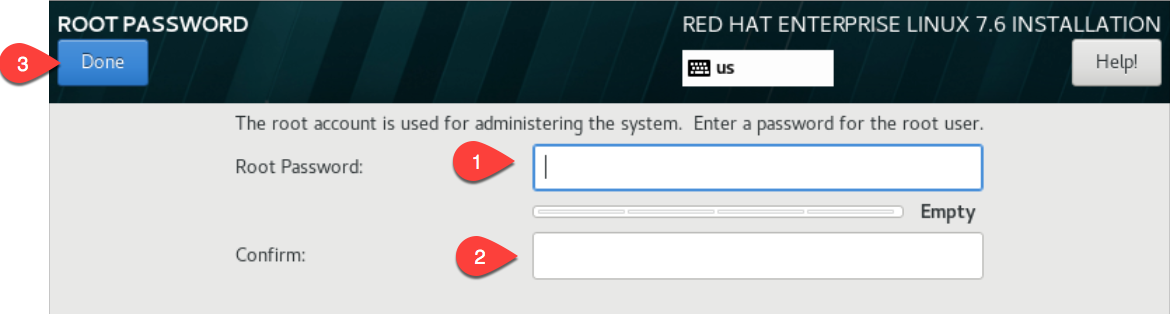
Configure the root password of the new RHEL VM.
Enter the root password twice, then click Done
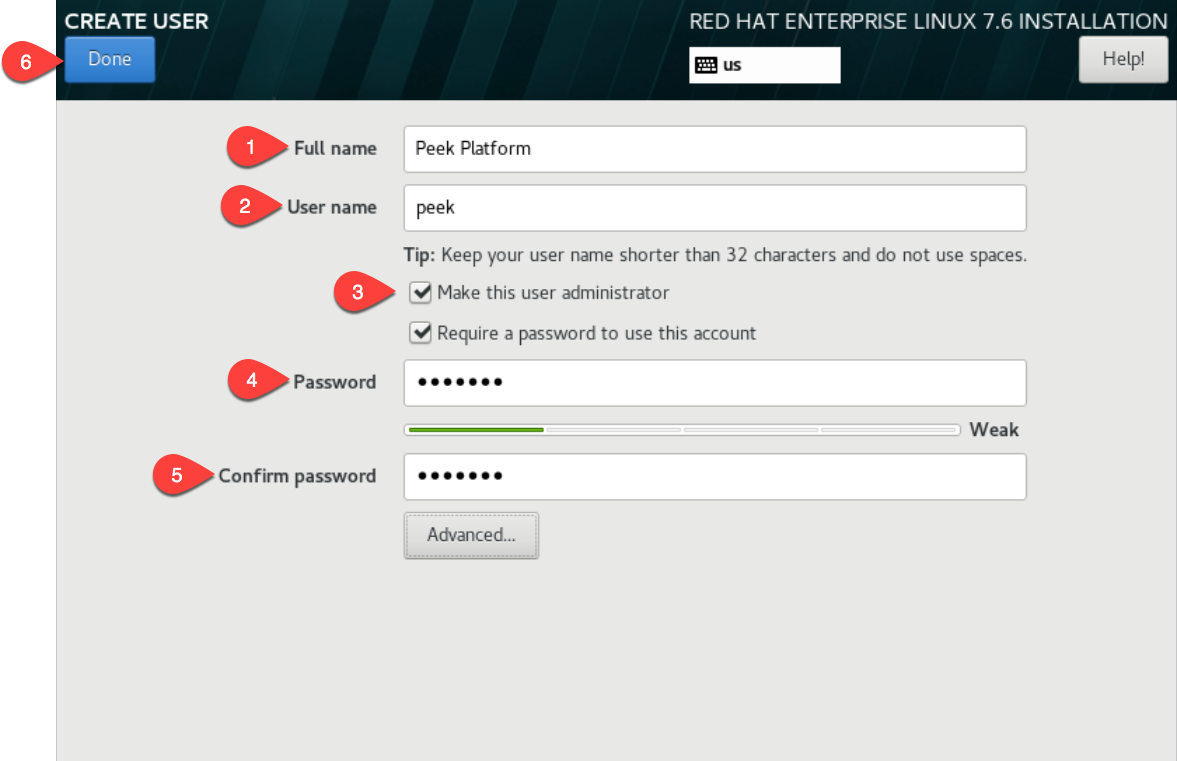
Create the peek user as follows.
Click Finish configuration
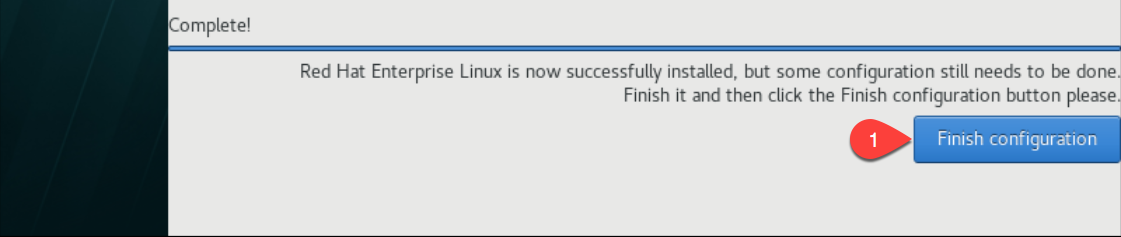
Click Reboot

After the server has rebooted, disconnect and remove the RHEL ISO from DVD drive in the VM software.
The OS installation is now complete.
Login as Peek
Login to the RHEL VM as the peek user, either via SSH, or the graphical desktop
if it’s installed.
Important
All steps after this point assume you’re logged in as the peek user.
Registering RHEL
The RHEL server must have access to the redhat repositories at rhn.redhat.com to install the required packages.
This section describes one way of registering a new RHEL server to a Redhat subscription. This is a paid subscription.
Run the following command to register the system. Replace MY_RHN_USERNAME with your redhat network username.
sudo date
# enter the password for peek

sudo subscription-manager register --username MY_RHN_USERNAME
# Enter the password for the RHN account
List the subscriptions, and select a pool.
sudo subscription-manager list --available | grep Pool
Subscribe to the pool. Replace POOL_ID_FROM_ABOVE_COMMAND with the Pool ID from the last command.
sudo subscription-manager subscribe --pool=POOL_ID_FROM_ABOVE_COMMAND
Test the subscription with a yum update, this will apply the latest updates.
sudo yum update -y
Note
If you want to remove the server from the pool, and unregister it, run the following.
sudo subscription-manager remove --all
sudo subscription-manager unregister
Removing IPv6 Localhost
Run the following command to ensure that localhost does not resolve to ::1 as this effects the PostgreSQL connection.
F=/etc/sysctl.conf
cat | sudo tee $F <<EOF
# Disable IPv6
net.ipv6.conf.all.disable_ipv6 = 1
net.ipv6.conf.default.disable_ipv6 = 1
EOF
sudo sysctl -p
sudo sed -i '/::1/d' /etc/hosts
Installing General Prerequisites
This section installs the OS packages required.
Note
Run the commands in this step as the peek user.
To begin, make sure that all the packages currently installed on your RHEL system are updated to their latest versions:
sudo yum update -y
Install the C Compiler package, used for compiling python or VMWare tools, etc:
PKG="gcc gcc-c++ kernel-devel make"
sudo yum install -y $PKG
Install rsync:
PKG="rsync"
PKG="$PKG unzip"
PKG="$PKG wget"
PKG="$PKG bzip2"

sudo yum install -y $PKG
Install the Python build dependencies:
PKG="curl git m4 ruby texinfo bzip2-devel libcurl-devel"
PKG="$PKG expat-devel ncurses-libs zlib-devel gmp-devel"
PKG="$PKG openssl openssl-devel"
sudo yum install -y $PKG
Install C libraries that some python packages link to when they install.
# For the cryptography package
PKG="libffi-devel"

sudo yum install -y $PKG
Install C libraries required for LDAP.
PKG="openldap-devel"

sudo yum install -y $PKG
Install C libraries that database access python packages link to when they install:
Warning
These packages are not from the Redhat Network.
FEDORA_PACKAGES="https://dl.fedoraproject.org/pub/epel/7/x86_64/Packages"

# For Shapely and GEOAlchemy
PKG="${FEDORA_PACKAGES}/g/geos-3.4.2-2.el7.x86_64.rpm"
PKG="$PKG ${FEDORA_PACKAGES}/g/geos-devel-3.4.2-2.el7.x86_64.rpm"

# For the SQLite python connector
PKG="$PKG ${FEDORA_PACKAGES}/l/libsqlite3x-20071018-20.el7.x86_64.rpm"
PKG="$PKG ${FEDORA_PACKAGES}/l/libsqlite3x-devel-20071018-20.el7.x86_64.rpm"

sudo yum install -y $PKG
Install C libraries that the oracle client requires:
# For LXML and the Oracle client
PKG="libxml2 libxml2-devel"
PKG="$PKG libxslt libxslt-devel"
PKG="$PKG libaio libaio-devel"

sudo yum install -y $PKG
Cleanup the downloaded packages:
sudo yum clean all
Installing VMWare Tools (Optional)
This section installs VMWare tools. The compiler tools have been installed from the section above.
In the VMWare software, find the option to install VMWare tools.
Mount and unzip the tools:
sudo rm -rf /tmp/vmware-*
sudo mount /dev/sr0 /mnt
sudo tar -xzf /mnt/VM*gz -C /tmp
sudo umount /mnt
Install the tools with the default options:
cd /tmp/vmware-tools-distrib
sudo ./vmware-install.pl -f -d
Cleanup the tools install:
sudo rm -rf /tmp/vmware-*
Reboot the virtual machine:
sudo shutdown -r now
Note
Keep in mind, that if the static IP is not set, the IP address of the VM may change, causing issues when reconnecting with SSH.
Update Firewall
Allow Peek through the firewall and port forward to the non-privileged port
# Peek Mobile website
sudo firewall-cmd --add-forward-port=port=8000:proto=tcp:toport=8000

# Peek Desktop website
sudo firewall-cmd --add-forward-port=port=8002:proto=tcp:toport=8002

# Peek Admin web site
sudo firewall-cmd --add-forward-port=port=8010:proto=tcp:toport=8010

# Persist the rules
sudo firewall-cmd --runtime-to-permanent
Install PostgreSQL
Install the relational database Peek stores its data in. This is PostgreSQL 10.
Note
Run the commands in this step as the peek user.
Setup the PostgreSQL repository:
PKG="https://download.postgresql.org/pub/repos/yum/reporpms/EL-7-x86_64/pgdg-redhat-repo-latest.noarch.rpm"
sudo yum install -y $PKG
Install PostgreSQL:
PKG="postgresql12"
PKG="$PKG postgresql12-server"
PKG="$PKG postgresql12-contrib"
PKG="$PKG postgresql12-devel"
PKG="$PKG postgresql12-plpython3"
sudo yum install -y $PKG
Install PostgreSQL Timescale
Next install timescale, this provides support for storing large amounts of historical data.
Setup the repository.
# Add our repo
sudo tee /etc/yum.repos.d/timescale_timescaledb.repo <<EOL
[timescale_timescaledb]
name=timescale_timescaledb
baseurl=https://packagecloud.io/timescale/timescaledb/el/7/\$basearch
repo_gpgcheck=1
gpgcheck=0
enabled=1
gpgkey=https://packagecloud.io/timescale/timescaledb/gpgkey
sslverify=1
sslcacert=/etc/pki/tls/certs/ca-bundle.crt
metadata_expire=300
EOL
Install the packages
# Install any updates to the operating system
# You may want to skip this step if you don't want to upgrade
sudo yum update -y

# Now install appropriate package for PG version
sudo yum install -y timescaledb-postgresql-12
Tune the postgresql.conf
PGVER=12
FILE="/var/lib/pgsql/${PGVER}/data/postgresql.conf"
sudo timescaledb-tune -quiet -yes -conf-path ${FILE} -pg-version ${PGVER}
Finish PostgreSQL Setup
Finish configuring and starting PostgreSQL.
Allow the peek OS user to login to the database as user peek with no password
F="/var/lib/pgsql/12/data/pg_hba.conf"
if ! sudo grep -q 'peek' $F; then
    echo "host    peek    peek    127.0.0.1/32    trust" | sudo tee $F -a
    sudo sed -i 's,127.0.0.1/32            ident,127.0.0.1/32            md5,g' $F
fi
Create the PostgreSQL cluster and configure it to auto start:
sudo /usr/pgsql-12/bin/postgresql-12-setup initdb
sudo systemctl enable postgresql-12
sudo systemctl start postgresql-12
Create the peek SQL user:
sudo su - postgres
createuser -d -r -s peek
exit # exit postgres user
Set the PostgreSQL peek users password:
psql -d postgres -U peek <<EOF
\password
\q
EOF

# Set the password as "PASSWORD" for development machines
# Set it to a secure password from https://xkpasswd.net/s/ for production
Create the database:
createdb -O peek peek
Note
If you already have a database, you may now need to upgrade the timescale extension.
psql peek <<EOF
ALTER EXTENSION timescaledb UPDATE;
EOF
Cleanup traces of the password:
[ ! -e ~/.psql_history ] || rm ~/.psql_history
Grant PostgreSQL Peek Permissions
The PostgreSQL server now runs parts of peeks python code inside the postgres/postmaster processes. To do this the postgres user needs access to peeks home directory where the peek software is installed.
Grant permissions
sudo chmod g+rx ~peek
sudo usermod -G peek postgres
Compile and Install Python 3.6
The Peek Platform runs on Python. These instructions download, compile and install the latest version of Python.
Edit ~/.bashrc and append the following to the end of the file.
##### SET THE PEEK ENVIRONMENT #####
# Setup the variables for PYTHON
export PEEK_PY_VER="3.6.8"
export PATH="/home/peek/cpython-${PEEK_PY_VER}/bin:$PATH"

# Set the variables for the platform release
# These are updated by the deploy script
export PEEK_ENV=""
[ -n "${PEEK_ENV}" ] && export PATH="${PEEK_ENV}/bin:$PATH"
Warning
Restart your terminal to get the new environment.
Download and unarchive the supported version of Python:
cd ~
source .bashrc
wget "https://www.python.org/ftp/python/${PEEK_PY_VER}/Python-${PEEK_PY_VER}.tgz"
tar xzf Python-${PEEK_PY_VER}.tgz
Configure the build:
cd Python-${PEEK_PY_VER}
./configure --prefix=/home/peek/cpython-${PEEK_PY_VER}/ --enable-optimizations
Make and Make install the software:
make install
Cleanup the download and build dir:
cd
rm -rf Python-${PEEK_PY_VER}*
Symlink the python3 commands so they are the only ones picked up by path:
cd /home/peek/cpython-${PEEK_PY_VER}/bin
ln -s pip3 pip
ln -s python3 python
cd
Test that the setup is working:
RED='\033[0;31m'
GREEN='\033[0;32m'
NC='\033[0m' # No Color

SHOULD_BE="/home/peek/cpython-${PEEK_PY_VER}/bin/python"
if [ `which python` == ${SHOULD_BE} ]
then
    echo -e "${GREEN}SUCCESS${NC} The python path is right"
else
    echo -e "${RED}FAIL${NC} The python path is wrong, It should be ${SHOULD_BE}"
fi

SHOULD_BE="/home/peek/cpython-${PEEK_PY_VER}/bin/pip"
if [ `which pip` == ${SHOULD_BE} ]
then
    echo -e "${GREEN}SUCCESS${NC} The pip path is right"
else
    echo -e "${RED}FAIL${NC} The pip path is wrong, It should be ${SHOULD_BE}"
fi
Upgrade pip:
pip install --upgrade pip
synerty-peek is deployed into python virtual environments. Install the virtualenv python package:
pip install virtualenv
The Wheel package is required for building platform and plugin releases:
pip install wheel
Install Worker Dependencies
Install the parallel processing queue we use for the peek-worker tasks.
Note
Run the commands in this section as the peek user.
Install redis:
ATOMICORP_SITE="https://www6.atomicorp.com/channels/atomic/centos/7/x86_64/RPMS"

# redis dependencies
PKG="${ATOMICORP_SITE}/jemalloc-3.6.0-1.el7.art.x86_64.rpm"

# redis
PKG="$PKG ${ATOMICORP_SITE}/redis-3.0.7-4.el7.art.x86_64.rpm"

# install redis and dependencies
sudo yum install -y $PKG
Enable the Redis service:
sudo systemctl enable redis.service
sudo systemctl restart redis.service
Install rabbitmq:
# install erlang
curl -s https://packagecloud.io/install/repositories/rabbitmq/erlang/script.rpm.sh | sudo bash

# install erlang
sudo yum install -y erlang

# Set rabbitmq repository
curl -s https://packagecloud.io/install/repositories/rabbitmq/rabbitmq-server/script.rpm.sh | sudo bash

# install rabbitmq
sudo yum install -y rabbitmq-server
Enable the RabbitMQ service:
sudo systemctl enable rabbitmq-server.service
sudo systemctl restart rabbitmq-server.service
Cleanup the downloaded packages:
sudo yum clean all
Enable the RabbitMQ management plugins:
F="/var/lib/rabbitmq/.erlang.cookie"; [ ! -f $F ] || rm -f $F
sudo rabbitmq-plugins enable rabbitmq_mqtt
sudo rabbitmq-plugins enable rabbitmq_management
sudo systemctl restart rabbitmq-server.service
Increase the size of the redis client queue
BEFORE="client-output-buffer-limit pubsub 64mb 16mb 90"
AFTER="client-output-buffer-limit pubsub 32mb 8mb 60"
sudo sed -i "s/${BEFORE}/${AFTER}/g" /etc/redis.conf

sudo systemctl restart redis
Install Oracle Client (Optional)
The oracle libraries are optional. Install them where the agent runs if you are going to interface with an oracle database.
Edit ~/.bashrc and append the following to the file:
# Setup the variables for ORACLE
export LD_LIBRARY_PATH="/home/peek/oracle/instantclient_18_5:$LD_LIBRARY_PATH"
export ORACLE_HOME="/home/peek/oracle/instantclient_18_5"
Source the new profile to get the new variables:
source ~/.bashrc
Make the directory where the oracle client will live
mkdir /home/peek/oracle
Download the following from oracle.
The version used in these instructions is 18.5.0.0.0.
- Download the ZIP “Basic Package”
instantclient-basic-linux.x64-18.5.0.0.0dbru.zipfrom http://www.oracle.com/technetwork/topics/linuxx86-64soft-092277.html - Download the ZIP “SDK Package”
instantclient-sdk-linux.x64-18.5.0.0.0dbru.zipfrom http://www.oracle.com/technetwork/topics/linuxx86-64soft-092277.html
Copy these files to /home/peek/oracle on the peek server.
Extract the files.
cd ~/oracle
unzip instantclient-basic-linux.x64-18.5.0.0.0dbru.zip*
unzip instantclient-sdk-linux.x64-18.5.0.0.0dbru.zip*
Install FreeTDS (Optional)
FreeTDS is an open source driver for the TDS protocol, this is the protocol used to talk to a MSSQL SQLServer database.
Peek needs this installed if it uses the pymssql python database driver, which depends on FreeTDS.
Edit ~/.bashrc and append the following to the file:
# Setup the variables for FREE TDS
export LD_LIBRARY_PATH="/home/peek/freetds:$LD_LIBRARY_PATH"
Warning
Restart your terminal you get the new environment.
Install FreeTDS:
PKG="https://dl.fedoraproject.org/pub/epel/7/x86_64/Packages/f/freetds-libs-1.1.20-1.el7.x86_64.rpm"
PKG="$PKG https://dl.fedoraproject.org/pub/epel/7/x86_64/Packages/f/freetds-1.1.20-1.el7.x86_64.rpm"
PKG="$PKG https://dl.fedoraproject.org/pub/epel/7/x86_64/Packages/f/freetds-devel-1.1.20-1.el7.x86_64.rpm"
yum install -y $PKG
Create file freetds.conf in ~/freetds and populate with the following:
mkdir ~/freetds
cat > ~/freetds/freetds.conf <<EOF

[global]
    port = 1433
    instance = peek
    tds version = 7.4

EOF
If you want to get more debug information, add the dump file line to the [global] section Keep in mind that the dump file takes a lot of space.
[global]
    port = 1433
    instance = peek
    tds version = 7.4
    dump file = /tmp/freetds.log
What Next?
Refer back to the How to Use Peek Documentation guide to see which document to follow next.