Developing With The Frontends
The Peek Platform is extensible with plugins. Unlike with the Python code, the frontend code can’t be just imported. The frontend code in the plugins have to be combined into build directories for each service.
This document describes how Peek combines the Frontend / Angular files into build projects.
The frontends are the Admin, Mobile and Desktop services.
Admin builds:
- Only a Web app, using @angular/cli
Mobile builds:
- A NativeScript app, using NativeScript
- A Web app, using @angular/cli
Desktop builds:
- An Electron app.
- A Web app, using @angular/cli
The platform code for combining the files for the frontends is at: https://bitbucket.org/synerty/peek-platform/src/master/peek_platform/build_frontend/
Combining Files
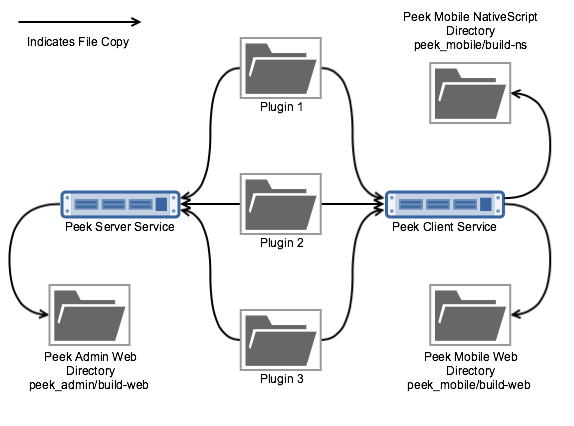
The Server and Client services prepare the build directories for all the frontends.
Peek originally used symbolic links to integrate the plugins, this approach become harder and harder to manage with both cross platform support and increasing complexity of the plugin integrations with the frontend.
Peek now uses a file copy approach, that is handled by the Client and Server services. There were many things to consider when implementing this code, consideration include:
Incremental file updates. Don’t rewrite the file if it hasn’t changed. This causes problems with development tools incorrectly detecting file changes.
Allow on the fly modifications.
Instead of using Trickery with tsconfig.json and special NPM packages that
switch between NativeScript and Web dependencies, Peek rewrites parts of the
frontend code on the fly. For example this method rewrites Web files to work with the
NativeScript frontend.
Here is an example,
NativescriptBuilder.py.
Angular Ahead of Time Compilation. The final nail in the symlink approach was Angular AoT Compilation support. With the new file copy approach, Peek does away with on the fly switching of NativeScript VS Angular dependencies.
Plugins in node_modules. Plugins in the frontends can leverage each other.
For example, other plugins can leverage services from peek_core_user for user
authentication. To do this, Peek copies files into node_modules. However, nativescript
doesn’t recompile these files during live sync, so Peek also compiles them and copies them
to the platforms directory.
End user customisation. The ability for the end user to overwrite files with out having to fork plugins, etc.
The file copy process, AKA “prepare” or “Combine”, is fairly simple:
- Use the list of loaded plugins
- Read the
plugin_package.json - Copy and transform files based on
plugin_package.jsonsettings. - Create static files for:
- Lazy loading routes for plugins
- Global services from plugins
- Home icon and Menu items
- etc
- Compile plugin code copied to node_modules for NativeScript
- Copy required files to the platform directory for NativeScript.
At this point the build directories are prepared and ready to run.
End User Customisations
End users, as in not developers, have the ability to hack the frontends. They may do this to change text, update icons, branding, etc.
Note
The following directory overlay is for build-web, for NativeScript use the ~/peek-server.home/frontendNodeModuleOverlayDir
or ~/peek-client.home/frontendNodeModuleOverlayDir.
Peek reads files from either the ~/peek-server.home/frontendSrcOverlayDir
or ~/peek-client.home/frontendSrcOverlayDir directories and overlays them
on top of the build directories.
This provides end users with the ability to alter any part of the Electron, Web or NativeScript frontends by copying a file into the customisation directory and then altering it.
This is a use at their own risk feature.
The following property is present in the Peek Server and Peek Client config.json
files.
{
    ...
    "frontend": {
        ...
        "frontendSrcOverlayDir": "/home/peek/peek-client.home/frontendSrcOverlayDir",
        "frontendNodeModuleOverlayDir": "/home/peek/peek-client.home/frontendNodeModuleOverlayDir",
    },
    ...
}
#1 Copy the plugin build directory into the frontend folder
cp -r synerty-peek-1.3.4/lib/python3.6/site-packages/peek_desktop/build-web/src/peek_plugin_pof_diagram peek-client.home/frontendSrcOverlayDir/
#2 Remove the files not being updated (we’re updating pofDiagram.component.web.html)
cd peek-client.home/frontendSrcOverlayDir/peek_plugin_pof_diagram/
rm -rf coord-set/ show-diagram/ *.ts
#3 Edit the file and restart Peek
vi pofDiagram.component.web.html
restart_peek.sh
#4 Monitor the logs and refresh Peek Desktop
http://peekserver:8002/peek_plugin_pof_diagram
# 5 Undo the changes
rm -rf ~/peek-client.home/frontendSrcOverlayDir/peek_plugin_pof_diagram
restart_peek.sh
Live Updating for Development
Both NativeScript and Angular CLI have development tools that provide live sync + refresh support.
Meaning, you can alter your code, save, and the tools will recompile, and update the apps. Angular CLI will update the code for the web page and reload it, NativeScript will compile the TypeScript, redeploy the javascript to the native app and reload the NativeScript.
Peeks frontend preparation code creates maps of where files should be copied from and to, then monitors all the source directories, and incrementally updates files as the developer works. This includes performing any on the fly changes to the files that are required.
To enable file syncing, in file(s)
~/peek-server.home/config.json or ~/peek-client.home/config.json
set frontend.syncFilesForDebugEnabled to true and restart the appropriate service.
You may also want to disable the web building. This isn’t required for the Angular CLI
development server and it slows down Server and Client restarts.
Set frontend.webBuildEnabled to false.
If DEBUG logging is also enabled, you’ll see Peek working away when you change files.
{
    ...
    "frontend": {
        ...
        "syncFilesForDebugEnabled": true,
        "webBuildEnabled": false,
        ....
    },
    "logging": {
        "level": "DEBUG"
    },
    ...
}
Now when you run:
# Start Angular CLI live dev server
npm start
Or
# Start NativeScript live sync
tns run <Platform>
The NativeScript and Web apps will automatically update as the developer changes things.
build-web
To build the dist dir, and serve it on a normal port run:
ng build -w
The -w option listens for changes.
To run the packages start scripts run:
npm start
Auto refreshes, deletes the dist that ng build creates, and the proxy settings for file resources and http vortex.
build-ns
Running the command tns device will list active virtual devices and connected physical devices
$ tns device

Connected devices & emulators
Searching for devices...

│ # │ Device Name         │ Platform │ Device Identifier                        │ Type     │ Status    │
│ 1 │ Synerty 008 iPad    │ iOS      │ a8f83ceb9ddd5d0df25d618a5a4c6d9bf7a6f5f9 │ Device   │ Connected │
│ 2 │ iPad Pro (9.7 inch) │ iOS      │ 57AF4696-FB0A-4E42-94EB-37C38164AAB6     │ Emulator │ Connected │
tns development build command builds the project for the selected target platform and produces an application package or an emulator package:
tns build <Platform>
tns development run command runs your project on a connected device or in the native emulator, if configured:
       tns run <Platform>


or: ::

       tns run <Device ID>
Developing on iOS Devices
Before Peek can be deployed the signing certificate must be transfered to the device using Xcode.
To develop with iOS you’ll need a developer account on https://developer.apple.com
Build the iOS Platform directory tns build ios then open the build-ns/platform/ios directory with Xcode.
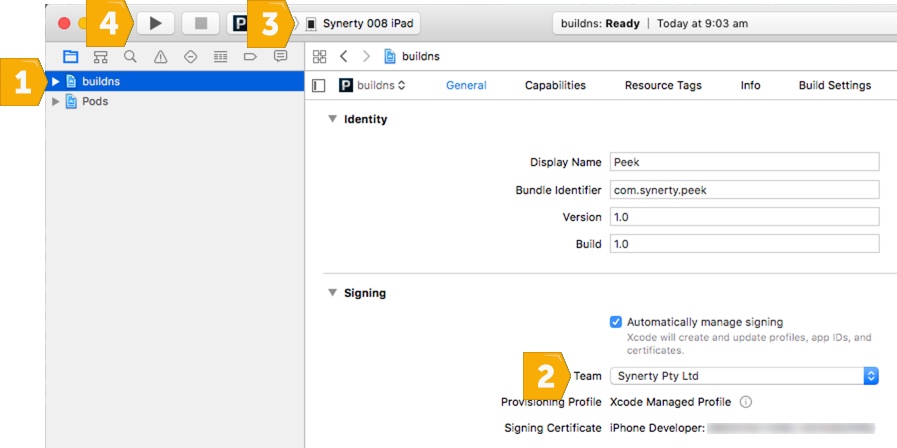
- Select the
buildnsproject - Select the Apple Developer Team
- Select the connected physical device
- Deploy Peek to the device
After following this procedure you can then use tns to deploy Peek as the certificate will remain on the device.