Setup OS Requirements Windows
The Peek platform is designed to run on Linux, however, it is compatible with windows. Please read through all of the documentation before commencing the installation procedure.
TODO: Upgrade to PostgreSQL 12 TODO: Add timescale support
Installation Objective
This Installation Guide contains specific Windows operating system requirements for the configuring of synerty-peek.
Required Software
Some of the software to be installed requires internet access. For offline installation some steps are required to be installed on another online server for the files to be packaged and transferred to the offline server.
Below is a list of all the required software:
- Microsoft .NET Framework 3.5 Service Pack 1
- Visual C++ Build Tools 2015
- PostgresSQL 10.4+
- Node.js 7+ and NPM 5+
- Python 3.6
- Virtualenv
- FreeTDS
- Msys Git
Optional Software
- 7zip
- Notepad ++
- Installing Oracle Libraries (Instructions in the procedure)
Installation of 7zip is optional. This tool will come in handy during the process but is not required.
Installation of Notepad ++ is optional. Notepad ++ is a handy tool for viewing documents and has useful features.
Installing Oracle Libraries is required if you intend on installing the peek agent. Instruction for installing the Oracle Libraries are in the Online Installation Guide.
OS Commands
The config file for each service in the peek platform describes the location of the BASH interpreter. Peek is coded to use the bash interpreter and basic posix compliant utilities for all OS commands.
When peek generates it’s config it should automatically choose the right interpreter.
"C:\Program Files\Git\bin\bash.exe" if isWindows else "/bin/bash"
Installation Guide
The following sections begin the installation procedure.
Create Peek OS User
Create a windows user account for peek with admin rights. Search for Computer Management from the start menu, and create the new peek user from there.
Warning
Make sure the username is all lower case.
| Account Type: | Administrator |
|---|---|
| Username: | peek |
| Password: | PA$$W0RD |
Sign in to the peek account.
Important
All steps after this point assume you’re logged in as the peek user.
Tip
Run the “control userpasswords2” command from the run window to have peek automatically login. This is useful for development virtual machines.
MS .NET Framework 3.5 SP1
Online Installation:
| Download: | http://download.microsoft.com/download/2/0/e/20e90413-712f-438c-988e-fdaa79a8ac3d/dotnetfx35.exe |
|---|---|
| From: | https://www.microsoft.com/en-ca/download |
Offline Installation:
| Download: | https://download.microsoft.com/download/2/0/E/20E90413-712F-438C-988E-FDAA79A8AC3D/dotnetfx35.exe |
|---|
Note
Restart if prompted to restart.
Visual C++ Build Tools 2015
Online Installation:
| Download: | http://go.microsoft.com/fwlink/?LinkId=691126 |
|---|---|
| From: | http://landinghub.visualstudio.com/visual-cpp-build-tools |
Offline Installation:
Install using the ISO
| Download: | https://www.microsoft.com/en-US/download/details.aspx?id=48146 |
|---|
Setup Msys Git
| Download: | https://github.com/git-for-windows/git/releases/download/v2.17.0.windows.1/Git-2.17.0-64-bit.exe |
|---|---|
| From: | https://git-for-windows.github.io |
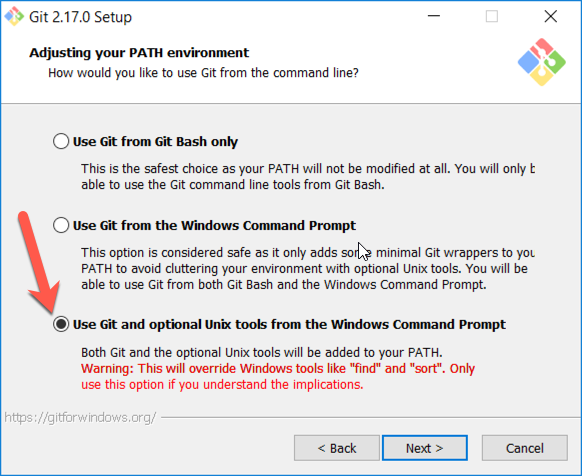
Use all default options, Except on the Adjusting your PATH environment screen.
On the “Adjusting your PATH environment” screen, select “Use Git and optional Unix tools from the Windows Command Prompt”
Note
This is equivalent to adding “C:\Program Files\Git\mingw64\bin” and “C:\Program Files\Git\usr\bin” to the system PATH environment variable.
Open a new command window, and type bash, it should find the bash command.
Press Ctrl+D to exit bash.
Open a new command or powershell window, and type git, it should find the git command.
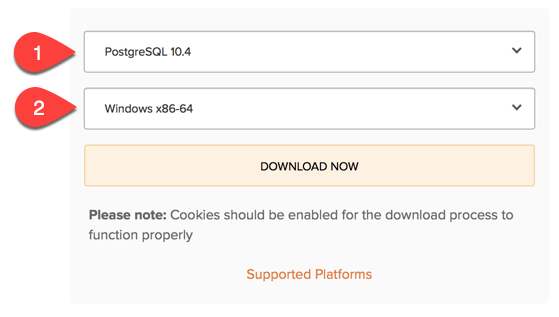
Install PostgresSQL
Peek requires PostgreSQL as it’s persistent, relational data store.
| Download: | https://www.enterprisedb.com/downloads/postgres-postgresql-downloads#windows |
|---|---|
| From: | https://www.postgresql.org |
Note
Ensure you download the 64bit version or PostgreSQL or the Peek windows service dependencies will not recognise it (“postgresql-10” vs “postgresql-x64-10”)
Install PostgresSQL with default settings.
Make a note of the postgres user password that you supply, you’ll need this.
Warning
Generate a strong password for both peek and postgres users for production use.
Synerty recommends 32 to 40 chars of capitals, lower case and numbers, with some punctuation, best to avoid these ` / \ ‘ “
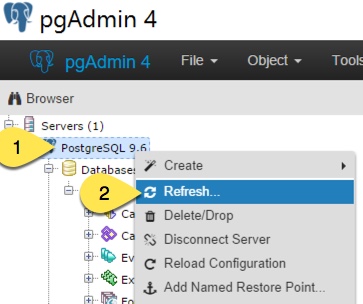
Run pgAdmin4
Open the Query Tool
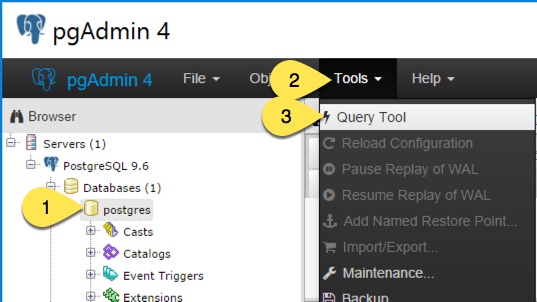
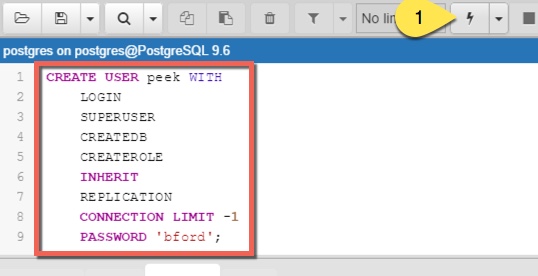
Create the peek user, run the following script:
CREATE USER peek WITH
    LOGIN
    CREATEDB
    INHERIT
    REPLICATION
    CONNECTION LIMIT -1
    PASSWORD 'PASSWORD';
Note
Replace PASSWORD with a secure password
from https://xkpasswd.net/s/ for production.
Example:
Create the peek database, run the following script:
CREATE DATABASE peek WITH
    OWNER = peek
    ENCODING = 'UTF8'
    CONNECTION LIMIT = -1;
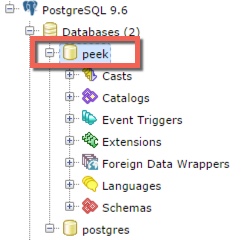
Confirm database was created
Install Python 3.6
| Download: | https://www.python.org/ftp/python/3.6.8/python-3.6.8-amd64.exe |
|---|---|
| From: | https://www.python.org/downloads/windows/ |
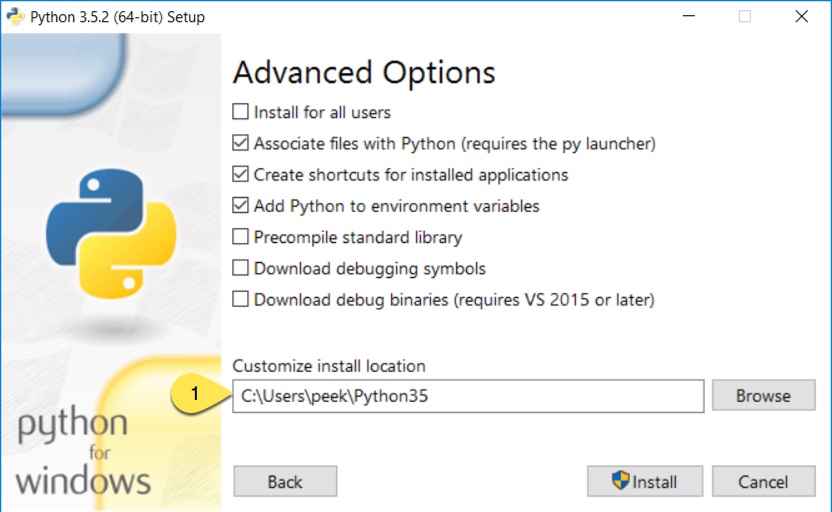
Check the ‘Add Python 3.6 to PATH’ and select ‘Customize Installation’
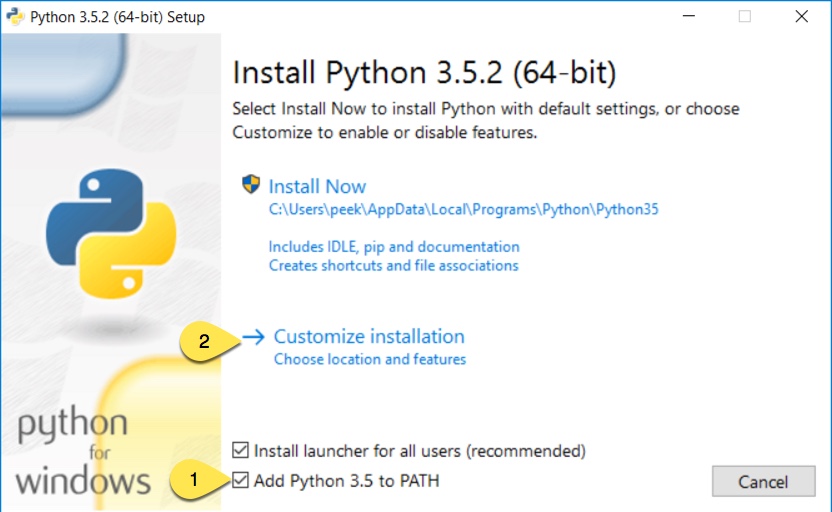
Update the ‘Customize install location’ to PATH C:\Users\peek\Python36\
Confirm PATH(s) to environment variables
echo %PATH%

...

C:\Users\peek\Python36\
C:\Users\peek\Python36\Scripts\
Virtual Environment
synerty-peek is deployed into python virtual environments. Install the virtualenv python package
Upgrade pip:
pip install --upgrade pip
Open the command prompt and run the following command:
pip install virtualenv
The Wheel package is required for building platform and plugin releases
pip install wheel
Install Worker Dependencies
Install the parallel processing queue we use for the peek-worker tasks.
Download and install Redis:
| Download: | https://github.com/MicrosoftArchive/redis/releases/download/win-3.0.504/Redis-x64-3.0.504.msi |
|---|
Download and install Erlang:
| Download: | http://erlang.org/download/otp_win64_20.0.exe |
|---|
Download and install RabbitMQ:
| Download: | https://github.com/rabbitmq/rabbitmq-server/releases/download/rabbitmq_v3_6_10/rabbitmq-server-3.6.10.exe |
|---|
Under Control Panel -> System -> Advanced system settings
Add the following to PATH in the “System” environment variables
C:\Program Files\RabbitMQ Server\rabbitmq_server-3.6.10\sbin
Tip
On Win 10, enter “environment” in the task bar search and select Edit the system environment variables
Enable the RabbitMQ management plugins:
rabbitmq-plugins enable rabbitmq_mqtt
rabbitmq-plugins enable rabbitmq_management
Confirm the RabbitMQ Management Console and the RabbitMQ MQTT Adaptor are listed under the running applications:
rabbitmqctl status
Install Oracle Client (Optional)
The oracle libraries are optional. Install them where the agent runs if you are going to interface with an oracle database.
Download the following from oracle.
The version used in these instructions is 18.5.0.0.0.
- Download the ZIP “Basic Package”
instantclient-basic-windows.x64-18.5.0.0.0dbru.zip pfrom http://www.oracle.com/technetwork/topics/winx64soft-089540.html - Download the ZIP “SDK Package”
instantclient-sdk-windows.x64-18.5.0.0.0dbru.zipfrom http://www.oracle.com/technetwork/topics/winx64soft-089540.html
Extract both the zip files to C:\Users\peek\oracle
Under Control Panel -> System -> Advanced system settings
Add the following to PATH in the “User” environment variables
C:\Users\peek\oracle\instantclient_18_5
Tip
On Win 10, enter “environment” in the task bar search and select Edit the system environment variables
The Oracle instant client needs msvcr120.dll to run.
Download and install the x64 version from the following microsoft site.
https://www.microsoft.com/en-ca/download/details.aspx?id=40784
Reboot windows, or logout and login to ensure the PATH updates.
Install FreeTDS (Optional)
FreeTDS is an open source driver for the TDS protocol, this is the protocol used to talk to a MSSQL SQLServer database.
Peek needs this installed if it uses the pymssql python database driver, which depends on FreeTDS.
| Download: | https://github.com/ramiro/freetds/releases/download/v0.95.95/freetds-v0.95.95-win-x86_64-vs2015.zip |
|---|---|
| From: | https://github.com/ramiro/freetds/releases |
Unzip contents into
C:\Users\peek
Rename C:\users\peek\freetds-v0.95.95 to C:\users\peek\freetds
Under Control Panel -> System -> Advanced system settings
Add the following to PATH in the “System” environment variables
C:\Users\peek\freetds\bin
Tip
On Win 10, enter “environment” in the task bar search and select Edit the system environment variables
Create file freetds.conf in C:\
[global]
    port = 1433
    instance = peek
    tds version = 7.4
If you want to get more debug information, add the dump file line to the [global] section Keep in mind that the dump file takes a lot of space.
[global]
    port = 1433
    instance = peek
    tds version = 7.4
    dump file = c:\\users\\peek\\freetds.log
dll files
| Download: | http://indy.fulgan.com/SSL/openssl-1.0.2j-x64_86-win64.zip |
|---|---|
| From: | http://indy.fulgan.com/SSL/ |
Ensure these files are in the system32 folder:
- libeay32.dll
- ssleay32.dll
You will need to duplicate the above files and name them as per below:
- libeay32MD.dll
- ssleay32MD.dll
What Next?
Refer back to the How to Use Peek Documentation guide to see which document to follow next.